What You Will Set Up
This guide walks you through configuring Stripe in live mode so your application can accept real payments. You will:
- Get your live API keys from Stripe
- Create the product with volume-tiered pricing (monthly & yearly)
- Optionally create coupon codes for promotions
- Update your production environment variables
- Verify everything works end-to-end
Switch to Live Mode & Get API Keys
- Go to dashboard.stripe.com and log in.
- In the top-right corner, toggle the switch from "Test mode" to "Live mode" (or turn off "Test mode").
- Navigate to Developers → API keys.
- Copy your Publishable key (starts with
pk_live_). - Click "Reveal live key" to copy your Secret key (starts with
sk_live_).
Save these two keys — you will need them in Step 5.
Create the Product & Monthly Price
In this step, you will create the product and set up the Monthly price with volume tiers — all on the same "Add a product" screen.
- In the Stripe Dashboard (live mode), go to Product catalog → + Add product.
- Fill in the product details at the top of the form:
- Name:
Effect Healthcare License - Description: (optional) "Comprehensive healthcare solution for hospital specialties"
- Image: (optional) Upload a product image if you have one
- Name:
Configure the Pricing Section
- In the Pricing section, make sure "Recurring" is selected (not "One-off").
- You will see a pricing model selector with these options:
- Flat rate
- Package pricing
- Tiered pricing ← Select this one
- Usage-based
- After selecting "Tiered pricing", you will be asked to choose between:
- Volume — "All units price based on final tier reached" ← Select this one
- Graduated — "Tiers apply progressively as quantity increases" ← Do NOT select this
- Set the currency to EUR (€).
- Set the billing period to Monthly.
Fill in the Tier Table
Stripe will show a tier table with columns: First unit, Last unit, Per unit, and Flat fee. By default it shows 2 rows. Here's how to fill it:
Row 1 (already exists):
| Field | Value |
|---|---|
| First unit | 1 (auto-filled, cannot change) |
| Last unit | 4 |
| Per unit | 100.00 |
| Flat fee | 0.00 (leave as default) |
Row 2 (already exists — "First unit" auto-updates to 5):
| Field | Value |
|---|---|
| First unit | 5 (auto-filled) |
| Last unit | 9 |
| Per unit | 90.00 |
| Flat fee | 0.00 |
Row 3 (click "+ Add tier" to add this row):
| Field | Value |
|---|---|
| First unit | 10 (auto-filled) |
| Last unit | ∞ (infinity — leave as default for the last row) |
| Per unit | 80.00 |
| Flat fee | 0.00 |
Final Result — Monthly Tier Table
When filled correctly, your price screen should look like this:

- Click Save product.
- After saving, click on the Monthly price to view its details. Copy the Price ID (starts with
price_). Save this as your Monthly Price ID.
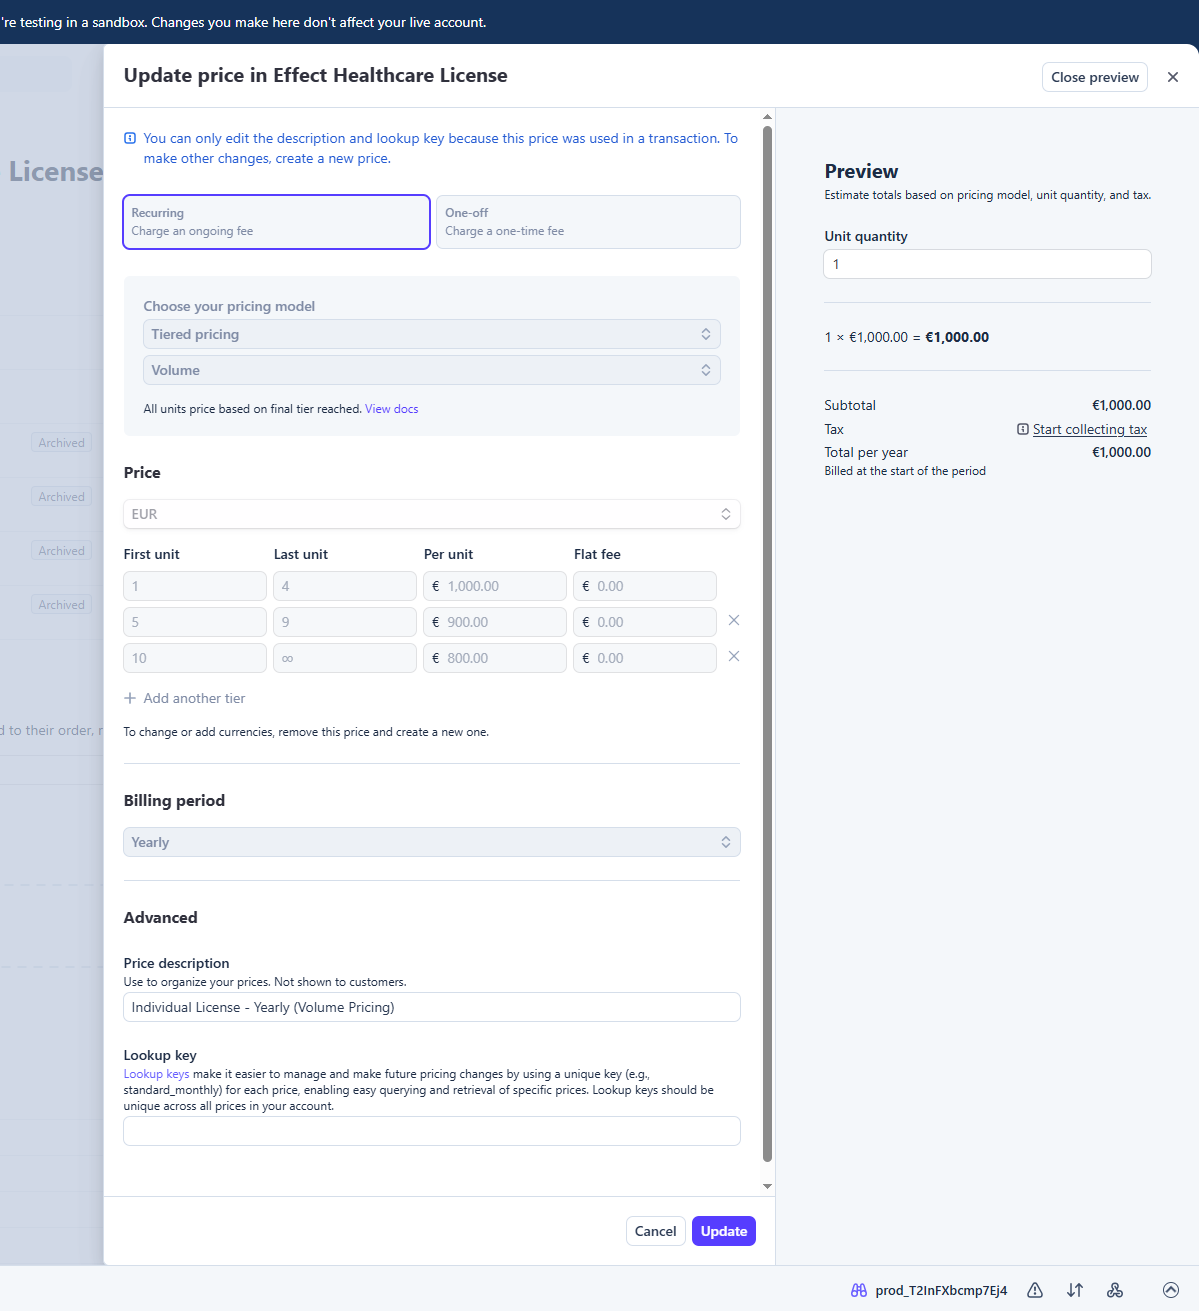
Add the Yearly Price
Now add a second price on the same product for yearly billing.
- Open the product you just created (Effect Healthcare License).
- Click "+ Add another price".
- Select "Recurring".
- Select "Tiered pricing", then "Volume".
- Set currency to EUR (€).
- Set billing period to Yearly.
- Fill in the tier table exactly as before, but with yearly prices:
| First unit | Last unit | Per unit | Flat fee |
|---|---|---|---|
| 1 | 4 | €1,000.00 | €0.00 |
| 5 | 9 | €900.00 | €0.00 |
| 10 | ∞ | €800.00 | €0.00 |
When filled correctly, your price screen should look like this:
- Click Save price.
- Copy the Price ID. Save this as your Yearly Price ID.
1. Monthly Price ID:
price_...
2. Yearly Price ID:
price_...
You will need both in Step 5.
Create Coupon Codes (Optional)
If you want to offer promotional discounts (separate from volume pricing), create coupons in Stripe:
- Go to Product catalog → Coupons → + Create coupon.
- Configure your coupon:
- Name: A display name (e.g., "Launch Offer 20% Off")
- ID: The code customers will use (e.g.,
LAUNCH20) — this is what gets entered in the coupon field or passed via URL - Type: Percentage off or Fixed amount off
- Duration: Once, repeating (X months), or forever
- Redemption limits: (optional) Max number of times it can be used, or expiration date
- Click Create coupon.
1. Entering a code during checkout in the coupon field.
2. Visiting the pricing page with the code in the URL:
yourdomain.com/pricing?code=LAUNCH20
Update Production Environment Variables
Update the following environment variables in your production server/hosting environment (not in the code). Replace the placeholder values with the keys and IDs you collected in the previous steps.
STRIPE_SECRET_KEY=sk_live_your_secret_key_here
NEXT_PUBLIC_STRIPE_PUBLISHABLE_KEY=pk_live_your_publishable_key_here
# ── Price IDs (from Step 3) ──
NEXT_PUBLIC_STRIPE_PRICE_INDIVIDUAL_MONTHLY=price_live_monthly_id_here
NEXT_PUBLIC_STRIPE_PRICE_INDIVIDUAL_YEARLY=price_live_yearly_id_here
# ── Subscription Settings ──
NEXT_PUBLIC_STRIPE_TRIAL_DAYS=1
MAX_LICENSE_ACTIVATIONS=5
# ── Application URL (production, no "test." prefix) ──
NEXT_PUBLIC_CLIENT_APP_ACTIVATION_URL=https://www.intuitive-pathways.app/
NEXT_PUBLIC_STRIPE_TRIAL_DAYS controls how many free trial days new subscribers get. Set to 0 to disable trials. The test environment uses 1 day for testing — adjust this to your desired production value.
Verify & Test
After deploying with the new environment variables, verify everything works:
- Visit the pricing page — confirm prices display correctly (€100/€90/€80 per license tiers)
- Toggle between Monthly and Yearly — both should show correct pricing
- Change license quantity — volume discounts should appear at 5+ and 10+ licenses
- Click "Get Started" — should redirect to Stripe Checkout with the correct total
- Complete a purchase with a real card — verify the charge appears in Stripe Dashboard (live mode)
- Confirm the subscription appears in the customer's account page
- Test license key generation — user should be able to generate and activate a key
- If you created coupons: test applying a coupon code during checkout
- If you created coupons: test the URL coupon flow (
/pricing?code=YOUR_CODE) - Verify the activation URL points to production (not test) in the license activation email/link
Quick Reference — Pricing Summary
| Licenses | Monthly (per license) | Yearly (per license) | Discount |
|---|---|---|---|
| 1 – 4 | €100.00 | €1,000.00 | — |
| 5 – 9 | €90.00 | €900.00 | 10% off |
| 10+ | €80.00 | €800.00 | 20% off |
Environment Variables Checklist
| Variable | Where to Find |
|---|---|
STRIPE_SECRET_KEY |
Stripe Dashboard → Developers → API keys → Secret key |
NEXT_PUBLIC_STRIPE_PUBLISHABLE_KEY |
Stripe Dashboard → Developers → API keys → Publishable key |
NEXT_PUBLIC_STRIPE_PRICE_INDIVIDUAL_MONTHLY |
Stripe Dashboard → Product → Monthly price → Price ID |
NEXT_PUBLIC_STRIPE_PRICE_INDIVIDUAL_YEARLY |
Stripe Dashboard → Product → Yearly price → Price ID |
NEXT_PUBLIC_STRIPE_TRIAL_DAYS |
Your choice (e.g., 0, 7, 14) |
MAX_LICENSE_ACTIVATIONS |
Your choice (currently 5) |
NEXT_PUBLIC_CLIENT_APP_ACTIVATION_URL |
Your production app URL |